Wednesday, March 30, 2011

Cap Research

Yesterday afternoon I decided to do a quick post on the three basic accessories; caps, kerchiefs, and aprons.  I took a few images of my caps, started to cut a new one out to show shapes, and then decided to find a few quick images for examples.  That's when I realized that caps tend to be an object we always use secondary sources for.  Most of my examples have been from commercial patterns, others examples, and "how-to" guides for patterning your own.  So, I skipped the posting and spent some time trying to find images and drawings of actual caps.  Easier said than done.  Oh, you find them in many artworks of the time, but they are hardly ever clear enough to make something from.
So, here is what I've accumulated.  It's mainly focused on the ruffled cap.  I'll show my examples and progress tomorrow or Friday.
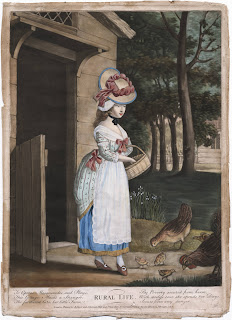
The Lewis Walpole Library has a selection of images which seem to show an abundance of clear caps:


Then onto extant examples.  Much harder to find, not surprisingly.  The Met seemed to have a decent number, although most were labelled 1700-1941.  MFA had many that were labelled, only a few were adult caps however.  I'm still searching in other databases, let me know if you come across any good examples and I'll try to add them in!

This is probably the best example I could find to compare to the above images.  It doesn't peak up in the center like most of them do, but it's very similar.  A broad date of 1750-1850 doesn't help much.

Another ruffled cap, dated 1750-1850 again.  An unusually wide hem on the ruffles.

This example seems to be shaped with darts in the very back.  Dated 1750-99.

A cap entirely made of narrow strips of lace sewn together.

I'm not exactly sure how this would appear when worn, but I'm curious now.  It has a number of drawstrings along it and is shirred very finely at the back.  This example and another are very similar in style.

A very fluffy example, from the Met, dating 1790-1804.  A little late for my time period, but a good example of a round caul and no band.

This example is a little earlier, dated 1785-98.  It also has a round caul, but is more of a lappet style.  The museum labels it as a Mobcap.

Late 18th or early 19th century cap, very simple in design.  The very back has a separate arc shaped piece rather than gathers to shape it.  Another example here shows that more clearly.


Monday, March 28, 2011

Accessories Showcase

There are so many types of accessories for ladies of the 18th century, some of which are rarely seen.  But add them all together with a nice set of clothes and the effect can be almost transporting.  However, the argument for accessories is to come another day this week.  Today, I just want to show you some of the things I've made.

Flamestitch wallet:  While relatively simple in shape and construction, the amount of time taken in embroidery makes this a rarely re-created object.  It's wool floss stitched to a linen backing.  Hundreds of different patterns and colors can be found.  I bound the finished piece in navy wool tape.  Very simple, but time consuming (and sanity consuming).

The inside is lined with silk taffeta.  There are two pockets controlled by a quarter circle on each side.  There is a layer of heavy interfacing inside of the flaps, but I wish I had used something more like pasteboard (cardboard).  


Here is the back layed out.  Very simple rectangle with curved ends at the top (also an optional design choice).  It makes for a wonderful piece to pull out at events to give business cards or even just to pay for an item.


Gloves:  Leather gloves are very much a staple of 18th century life.  A riding habit isn't truly complete without them.  And they do far better than mitts in the cold weather.  My pair is made from deerskin, the seams whipped with linen thread.  I'm hoping to make a slightly longer pair to meet up with my gown sleeves and a very short pair to go with the riding habit.  I also need to make the bicep length Regency style out of white pliver leather (skimmed down to the very thinnest skin possible).  Interesting note if you do try to make your own pair, leather does have a grain.  Therefore a bias.  Use it wisely.  Or you'll end up ripping it out rather quickly.  Most of my glove leather I get from Uncle George.  Pliver or Skiver is the thinnest, Kid is often a little heavier.  Deer, Kip, and Goat can also be possibilities but are sometimes too heavy.

Mitts:  I've got at least five pairs of these.  They're so simple to make and can add a very nice accent or wind/sun block.  These are worsted wool lined with persian silk.  My other pairs are un-lined worsted, lined linen, un-lined linen, and a fancy embroidered pair.  Covers the range of temperatures.  But, I'm sure there are more to come.

Pinballs:  There are so many ways to make these.  I'm just showing a cross-stitch, crewel, and a pieced geometric (paper in each piece to hold the shape).  You can do just about any embroidered stitch you would like, such as the flamestitch like the wallet.  I usually put a ribbon around the seam to finish them, although a metal ring would also work (it's just very expensive).

Needlecase:  Based on the original in 18th Century Embroidery Techniques.  There are four petals attached at one point with a shell button.  The leaves are taffeta with silk floss and ribbon embroidery (2mm wide from Hedgehog Handworks).  There is a small square of leather on two of the leaves to put the needles through.  The edges are bound with a woven silk fabric cut on the bias.  This is a deceptively fast project.

Buttons:  They are almost an accessory unto themselves, really.  Fitting out a jacket with death head buttons can make a massive difference.  Here you see plain, two color, and metallic.  The stripes can be any width.  You can also do six point instead of four.  When deciding on a pattern for a garment I like to take circles of paper and pencil in the lines.

Caps:  They come in all sizes and shapes.  I often make mine out of linen for regular use.  Cotton was more common post 1800.  Silk gauze, embroidered cotton, or a woven stripe cotton or linen are viable options.  This one is plain linen, made with a double ruffle.  The base is a very simple caul and ruffle connected with a band.  I used two parts for my bands to sandwich the other edges inside (less finishing!).  The second ruffle is self finished and whipped onto the edge of the band.  The ribbon (pinned on) hides the edge.

There's a small drawstring in the back bottom to fit it to the head and give it a nice poofy look.

This cap shows the band a little more clearly.  I made the band very wide in this cap to cover the ears well.  It's a nice weight of linen with a check'd pattern woven in.  I cheated a bit and added a lining to the caul and a third layer in the band for warmth.

Hand fan:  You can't last a summer without one.  Of course, they don't have to be this fancy.  My favorite fan is just one layer of plain silk taffeta (I used fray-check on the edges) glued to a nice set of sticks (near the bottom of the page here).  This fan was painted on habotoi silk with gauche.  I did use an anti-diffusant primer on the silk, although I'm not sure it was necessary.  The design is based on an original in a book of fans I own.  The sticks are just the cheap bamboo kind painted over (I hadn't found a resource for good ones yet).  There are sequins sewn on it as well.  The gold is done with acrylic paint, which helps to finish the edges.


Sunday, March 27, 2011

Interim

I'll be back tomorrow with a real post, I promise.  It's been a weird weekend.  Here's a bit of what's coming up.  I've got an accessories workshop this next weekend, so a few posts about accessories seems in order.  And maybe one about plain gowns to supplement, we shall see.  In the mean time, here's a hand-painted fan I made a while back, and learned a lot from!


Friday, March 25, 2011

Regency Evening Gown: Designing

I had some extra time today, so I decided to start on my taffeta 1810s gown.  The question is, what to do with it?  I purchased this silk taffeta a couple of months ago from Burnley & Trowbridge with a general idea of what I wanted.  A gown circa 1812-15 with a decent amount of trimmings, for some reason vandyking came to mind.  It's a pale aqua with a small white pinstripe.
 After a few days of searching, I came across this image.  The gown on the left not only has a very similar fabric, but has all the trimmings I was looking for.  The next challenge was to find more images and extants that resemble it.  Different angles, especially a back on a similar gown, can help to understand the shape.  It also helps to know what makes this gown 1816 distinctly, because I would like to move the date up slightly on style if possible.

This fashion plate is a bit earlier in years, around 1811 I think (I need to go back through a huge database to find that date, ugh).  The neckline crosses over like my drawing, but the shoulder strap width is much wider.  The shoulders also sit up higher.  Less trimming, but it is more of a casual morning dress in style.

This definitely resembles the previous plate, same neckline.  A bit of trim around the neck, sleeves, and hem.  But, more gathering under the bust.

Going even later than my plate, this one being from 1818.  The trimming style is very similar.  The neckline seems to be almost horizontal, however.  Hints that the neckline may be the biggest clue to what makes my plate 1816, rather than an earlier style.  There's no visible shoulder strap, probably just a very tiny 1/4" or so strip the sleeve is gathered to, like this gown.

I don't have the plates to show how I reached the conclusion that the trimming wasn't what made it a later style, since they're in a book.  However, I will at least describe it.  There's one plate from 1811 where the gown has four layers of zig-zag style trim around the hem, rather deep.  The sleeves also have three layers of that same trim.  Another 1811 gown has gathered, pinked trim around the hemline, one high up, another at the hem.  Trim around the neckline is commonly seen throughout the Regency period.  I did find a couple of 1812 images where the neckline is very wide, almost starting off the shoulders, but the v-neck in front reaches all the way up to the top of the shoulder almost meeting the back.  The only trimming I didn't find an earlier facsimile for was the second layer around the bust.  However, I can wait until the garment base is finished to decide if I want that or not.  It may look awful in real life, or just too bare without it.

Problem #2.  Fashion plates don't show the back of most gowns (or if they do, there's no front!).  Figuring out what would be appropriate for that style of neckline is going to fall to the original garments. The problem is, I just can't seem to find any.  There are a few with somewhat similar fronts, but just not quite right.
This original in the Met, from 1810, has the v-neck shape, with a small modesty piece instead of crossing the fronts.  Similar amount of trim and wide neckline.
The back scoops down fairly low, but not extremely.  It fastens with ties.  Possibility for fastening, but rather un-exciting.

This garment, sold by Vintage Textile, has the crossed front like the two earlier plates.

The back is one solid piece, meaning the fastening occurs invisibly on the front somehow.  It also has a scooped neckline though.

And here the mystery is solved.  The front is created with two separate pieces that attach with ties.


This gown, called Hortense, from the Napoleon and the Empire of Fashion exhibit shows a lovely back. I don't know what the front looks like unfortunately (anyone seen it?).  The trimming on the neckline doesn't seem unlike my fashion plate and would be very pretty (and unusual).
I've also seen plates (and an original at the Kyoto museum) that show lacing up the back.  Some plates even show that low v-neck in back, like the Hortense gown, but with a laced up panel behind it.  I honestly still can't decide.  I'm leaning away from the front fastening, because I'm afraid I can't invisibly control that style well enough in front, leaving an open slit on the side, etc.  That leaves me with buttons, the v-neck and/or lacing.  If you've happened across that style of neckline, please let me know.  I'd love to see an original showing what they deemed fashionably appropriate with it!

Thursday, March 24, 2011

Jackets

I realized yesterday that there are many garments I've never posted.  Even some that I had shown or talked about progress with!  I'm still in the process of taking pictures of everything I've made, so here are a few different styles of jackets that I've created over the last three years:

Caraco Jacket, based on this original in the V&A.  The fabric is a cotton chintz from the Williamsburg collection that came out a few years ago.  My biggest issue was the unusual shape of this garment.  It was clearly made from either wide fabric, or was short enough to use it lengthwise.  Unfortunately not the case with mine, so there are some hidden seams in the back.  The fronts are fairly normal.  The bodice and skirt are one piece.  The facing is folded back and opens up below the waist.  The side seams have pleats inside of them as well.  There is a separate stomacher which is pinned on, then three sets of tabs extend across it.  I wove the kerchief between them.  The sleeve cuffs are pulled up by a cord over a button, with a small pleated trim.

The back is the unusual part.  I must admit I spent hours looking at the photos of the original, mapping out the chintz they used to see angles and possible seams.  The center back pleat is just like a Robe a l'Anglaise, but just one instead of the normal two.  What gets weird is that the sleeves are of the same piece as the back.  Why?  I have no clue, but it was a fun challenge to drape.  There's no center back seam, and a small tuck is taken at the waist to shape it.  I need to make a few alterations to the petticoat, it being too short and a little narrow for my taste.

Bedgown, patterned from Diderot.  I know there is a commercial pattern based on this, but I was curious to see what alterations had been made from the original.  If you've ever seen it, the most obvious thing is that mine is a great deal shorter.  The exterior is a worsted wool with a heavy linen lining.  I wish the sleeves were longer, but I was using leftovers and ran out of fabric for that.  The front ties with linen tape, and you would usually wear an apron over it.  It's really all one piece with the seams up the sides, very geometric design.
The back has a very deep box pleat that opens at the waist.  I'm still struggling on how to make the collar  part of the main garment and get it to lay correctly.  The longer you cut the collar in back, the further down you're cutting into the back neckline.  The modern patterns fix this with an added collar piece, but I wanted to see if I could follow the instructions exactly.  It works, but pulls a little funny.  Would probably fit a woman with 18th century posture better since their shoulders sit further back.


Fitted jacket, from the Snowshill collection in Janet Arnolds book.  I did make the cuffs a little smaller.  The front pieces have gores put in to allow for the hips.  I think mine needed to be a little larger and definitely taller.  The cuffs are simple pleated bands, whipped on.  The front pins closed.  It's just a light weight linen, meant to be a good summer weight.

The back has excess in the skirts at the seams, cut with extra "pie" wedges to create the fullness at the hem and not the waist.  I'm still struggling to keep them looking decent, but I think it's the fabric.


Short gown, which I don't really know provenance for.  I've made dozens like it for where I used to work, and it's one of their fairly recent designs (so it's well researched I'm sure).  It's very simple though, being a singular piece and unlined.  There are facings on the sleeves to allow them to fold back.  The center front laps over and pins shut.  Edges are simply rolled to be finished.  This is my lightest garment, made out of complete necessity for a Virginia summer.
The back has pleats sewn in similar to a Robe a l'Anglaise to fit the garment to the body.  There is a small piece used inside the back neckline to face it, rather than rolling the pleated edge.  By far one of the easiest things I've made.  I cut one out for my mother and handed her this as an example, which she completed easily in a weekend.  She's a beginner to historical costumes, only having made a petticoat and apron prior to it.


A quilted waistcoat isn't quite a jacket, I know.  I did a post on this a while back, but these are much better images.  Based on an original at the Atwater Kent Museum.  Sharon Ann Burnston wrote an article about it here.  Mine is a cotton chintz with linen lining, bamboo batting, and linen tape binding.

A very simple design, it could be worn around the house for lounging, or along with stays for warmth.  I sometimes wear it under a gown, occasionally over if the gown is not large enough to accommodate the added width.  It isn't meant to be worn on it's own however.  Namely, it's not a bodice!!  I wouldn't wear it as the image shows in public.