
The next step in our tailoring process will be the actual cutting of the fabric. While you may be using a pattern complete with seam allowances, facings, and details, many pre-1950s patterns will be missing these pieces. If you are drafting your own you'll find it necessary to account for all of these in the process as well. In my case I'll often adjust the modern patterns, or at least double check, for many of the details I prefer to have.
Seam Allowances
In professional tailoring seam allowances are not put on to the pattern. This is standard practice for all time periods and something I swear by. A great deal of tailoring is done by hand, but even in the case of machining the seams it helps to have the actual stitching line drawn or basted out. This practice is done with corsetry as well- if every seam is cut just a little wide and adds 1/16" it can be disastrous overall. There is no standard size of allowance either. It varies widely depending on the area of the pattern, the fabric, and personal preference. I consider 1/2" to be my "standard", though I'll cut anywhere from 1/4" to 1 1/2" on the same piece.


Grown-on
In addition to regular seam allowances you might decide to put in elements like pockets on a seam or buttoned vents on a jacket sleeve. These can have pieces seamed on, but it's much easier to cut them on ahead of time, reducing bulk along the edges. The fly for a pair of trousers can also be included in this.
Facings & Upper Collar
These have similar needs, both expecting to be rolled. If these pattern pieces are not provided for you'll need to adjust the front and under collar slightly. In order to have these roll over the outside and not pull they'll be ever so slightly larger- only about 1/8" larger around the outside edges. The front facings will only cover part of the inside of the front, usually going from mid-shoulder and down to around 4" at the hem. If the shoulder has a dart, which is common in women's jackets, the lining can accommodate this rather than the facing.
Under Collar
This is typically cut on the bias with a seam down the middle. The interfacing for the collar is cut the same way.
Hems
1 1/2" or 2" is a comfortable hem size for the bottom of a jacket or sleeves. I sometimes go a little over for pants, but 2" is preferable there as well.
Linings
There's not going to be a huge difference between your lining pattern and your regular pattern. It's important to leave at least 1" seam allowance center back so that you can put in a slight pleat from neck to wait. The outer fabric usually has a bit more stretch than the lining so it prevents stress across the shoulders. You'll also account for the front facing and not needing as much hem. I either cut on the fold line for the hem or add 1/2".
Interfacings
This can seem like the most complex part of cutting simply because there are rarely separate pattern pieces or instructions for this section. Keep in mind that you should add on seam allowance for these pieces, even if you are going to trim it down in the end. Pad-stitching and slight cutting differences are much easier to correct for after everything is basted and stitched together. Other small interfacings like those for pocket slits or sleeve hems I cut as I get to them, often utilizing scraps.


Seam Allowances
In professional tailoring seam allowances are not put on to the pattern. This is standard practice for all time periods and something I swear by. A great deal of tailoring is done by hand, but even in the case of machining the seams it helps to have the actual stitching line drawn or basted out. This practice is done with corsetry as well- if every seam is cut just a little wide and adds 1/16" it can be disastrous overall. There is no standard size of allowance either. It varies widely depending on the area of the pattern, the fabric, and personal preference. I consider 1/2" to be my "standard", though I'll cut anywhere from 1/4" to 1 1/2" on the same piece.

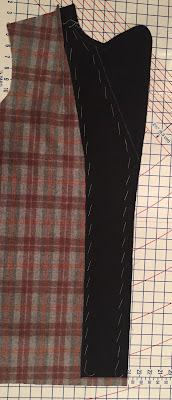
I generally add extra to the center back just in case the shoulders end up too narrow. The side of the front piece to adjust for overall size, but also a flare to the fronts armscye in case it needs to be taken in. The shoulder excess is due to my large shoulders being a common problem, but it's useful if doing an older pattern where our modern shape and posture might be an issue. The neckline I sometimes add to, but mostly when working on a body that has a tendency towards bad posture. If the head is kept further forward the collar will gap in the back.

For the sleeves I only add extra to the curve of the upper in case of fitting issues. If your pattern is for something tight in the sleeve then adding more to the allowances of the top piece would be a good choice. The extra at the bottom of the seam is if you are dealing with a vent. This can definitely be stitched on in different ways, but if you can remember to do it this can be easier.

Most of the extra goes into the back of a pair of trousers, not just in the out and in seams, but flaring out the center back seam. You'll find this done even in modern men's suit trousers because it allows for you to adjust the waist measurement later (unlike the extras in the jacket, trousers keep their larger seam allowances). The weird shapes on the side seam are for a pocket on the seam. No matter how large I make the hips in my trousers I can never get it enough that that style of pocket doesn't gap. So, rather than have pocketing visible I make sure that the back extends far enough.

Remember to stitch just inside of the chalked stitch lines so not to add the width of the line itself to the pattern. I do the same with the cut line, cutting just inside.
Grown-on
In addition to regular seam allowances you might decide to put in elements like pockets on a seam or buttoned vents on a jacket sleeve. These can have pieces seamed on, but it's much easier to cut them on ahead of time, reducing bulk along the edges. The fly for a pair of trousers can also be included in this.
Facings & Upper Collar
These have similar needs, both expecting to be rolled. If these pattern pieces are not provided for you'll need to adjust the front and under collar slightly. In order to have these roll over the outside and not pull they'll be ever so slightly larger- only about 1/8" larger around the outside edges. The front facings will only cover part of the inside of the front, usually going from mid-shoulder and down to around 4" at the hem. If the shoulder has a dart, which is common in women's jackets, the lining can accommodate this rather than the facing.
Under Collar
This is typically cut on the bias with a seam down the middle. The interfacing for the collar is cut the same way.
Hems
1 1/2" or 2" is a comfortable hem size for the bottom of a jacket or sleeves. I sometimes go a little over for pants, but 2" is preferable there as well.
Linings
There's not going to be a huge difference between your lining pattern and your regular pattern. It's important to leave at least 1" seam allowance center back so that you can put in a slight pleat from neck to wait. The outer fabric usually has a bit more stretch than the lining so it prevents stress across the shoulders. You'll also account for the front facing and not needing as much hem. I either cut on the fold line for the hem or add 1/2".
Interfacings
This can seem like the most complex part of cutting simply because there are rarely separate pattern pieces or instructions for this section. Keep in mind that you should add on seam allowance for these pieces, even if you are going to trim it down in the end. Pad-stitching and slight cutting differences are much easier to correct for after everything is basted and stitched together. Other small interfacings like those for pocket slits or sleeve hems I cut as I get to them, often utilizing scraps.

This example is from a 1914 women's suit I constructed. The main body is buckram and the chest piece is horsehair. There is piecing that will be cross-stitched on both sides. The roll line and shoulder dart are marked. This style is the full width of the shoulder coming down to a point because of the jacket shape. If the jacket had a straight front it would be roughly 3-4" wide at the hem.

This 1950s coat uses medium weight hymo for the body and no second layer in the chest. The shape not only is the width of the shoulder, but extends to the side seam as well.

A two layer interfacing was put in around the hem after the body was assembled, about 8" wide. This was done to achieve the Dior New Look style iconic of the early 1950s. The first layer was the same hymo, the second of horsehair. This has a back seam and side seams to keep with the curve of the jacket.

Less coverage is also an option. This interfacing of a 1940s overcoat doesn't extend the full width of the shoulder. It's done in a heavy hymo, mostly because I have a lot of that fabric sitting around and the heavier weight of the wool allows for it to be used.
No comments:
Post a Comment